 Pin
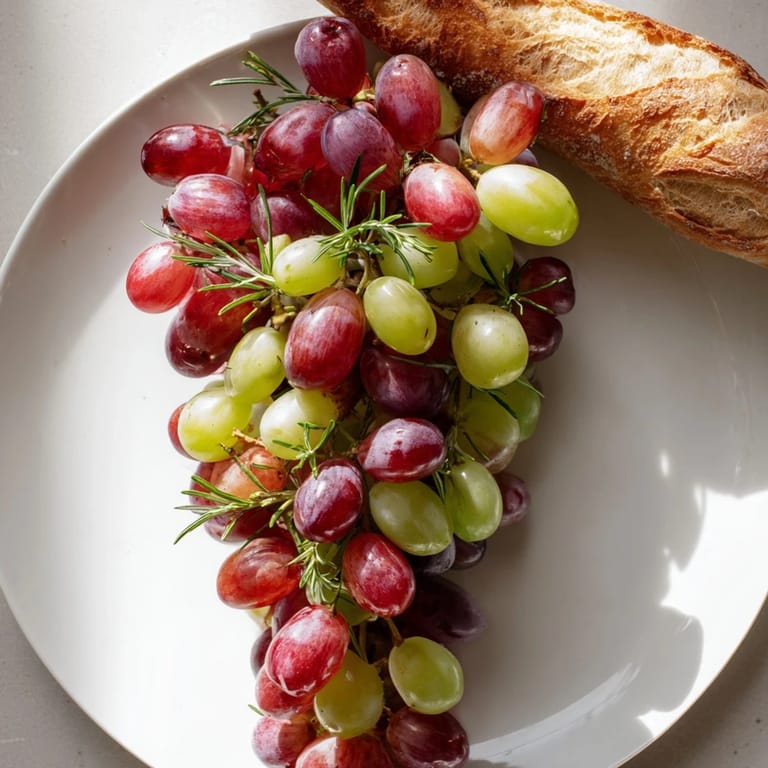
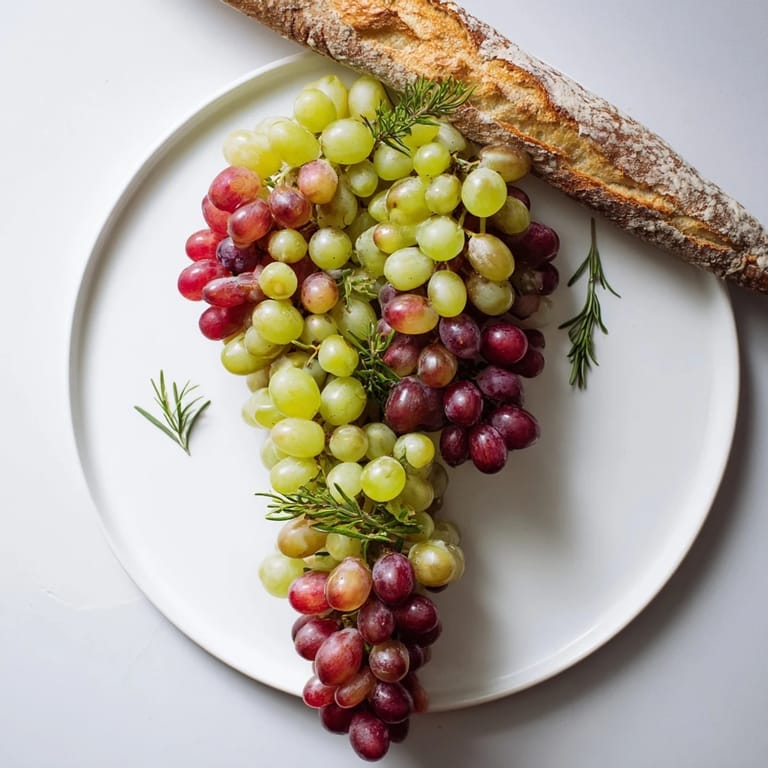
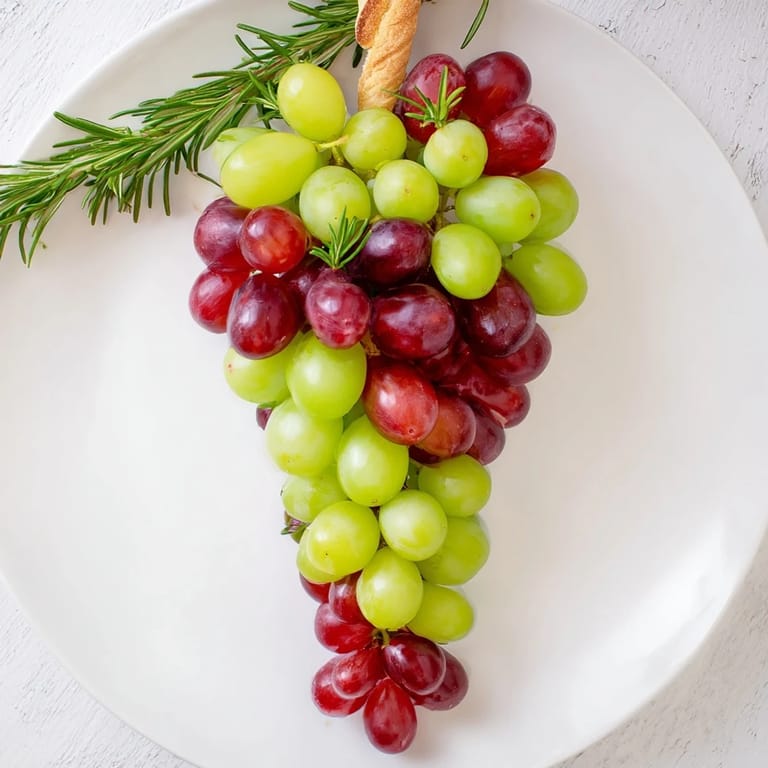
Pin I discovered this grape cluster while helping a friend prepare for her vineyard wedding reception, and I was immediately captivated by how something so simple could look like edible art. We spent an afternoon arranging nearly two thousand grapes into this magnificent cascading shape, and when guests arrived, it became the conversation starter before anything else. That's when I realized the most memorable dishes aren't always the most complicated—sometimes they're the ones that make people pause and smile before they even take a bite.
The first time I made this for a wine tasting event, a guest reached over and gently pulled a grape from the bottom of the cluster, and suddenly everyone else followed. Within minutes, what had been a centerpiece became an interactive experience, with laughter and conversation flowing as naturally as the wine. I realized then that the most powerful recipes are the ones that bring people together without needing fancy plating or complicated techniques.
Ingredients
- Green seedless grapes: 600 g (1.3 lbs)—these provide a crisp, bright counterpoint to deeper reds and create visual interest with their color contrast
- Red or black seedless grapes: 600 g (1.3 lbs)—choose whichever deepest color appeals to you; they're the visual anchor at the bottom of your cluster
- Rustic baguette: 1 whole loaf, or 10–12 breadsticks as your stem alternative—look for something with character and texture that mimics a real grapevine branch
- Thin salami sticks (optional stem alternative): 150 g (5 oz)—Italian grissini-wrapped varieties work beautifully if you want a less bread-forward presentation
- Fresh herbs for garnish (optional): small bunches of thyme, rosemary, or actual grape leaves if you can find them—these tiny touches transform the whole presentation from impressive to magical
Tired of Takeout? 🥡
Get 10 meals you can make faster than delivery arrives. Seriously.
One email. No spam. Unsubscribe anytime.
Instructions
- Prepare your grapes with care:
- Wash each grape gently under cool running water and pat completely dry with a clean kitchen towel—moisture is the enemy of a beautiful presentation because grapes will slip around and lose their grip on one another. If you can find grapes still clinging in small clusters of three to five, leave them attached; they'll add a wonderfully natural, organic quality to your final arrangement.
- Choose your stage:
- Select a large wooden board or white platter that will serve as your canvas. Wooden boards feel warm and rustic, while white platters make the grapes practically glow. Either way, you want something substantial—these grapes need real estate to shine.
- Build the shape from the bottom up:
- Start at the widest part of your platter and begin arranging grapes in a tight formation, creating that unmistakable teardrop or cascade shape of a hanging grape bunch. Think about working in concentric circles or rows, gradually narrowing as you move upward. This is meditative work—take your time, turn grapes to show their best side, and don't worry if it takes longer than you expect. The magic happens in this patient building.
- Crown with your stem:
- At the tapered top, position your chosen stem—whether that's a baguette cut at a dramatic angle, standing breadsticks arranged like branches, or sleek salami sticks lined up like a natural grapevine. This is where the illusion comes together, where it stops being just grapes and becomes something that looks like it grew from the earth.
- Tuck in finishing touches:
- Nestle small sprigs of fresh herbs—thyme, rosemary, or actual grape leaves if you've found them—around where the grape cluster meets its stem. These green touches are like nature's signature, making the whole composition feel less arranged and more discovered.
- Present with confidence:
- Step back and admire what you've created. This is meant to be served immediately, still fresh and glistening, as the centerpiece of your gathering. Let guests discover that they can simply reach out and pull grapes and pieces of bread or salami—the interactivity is part of the gift.
 Pin
Pin My most treasured memory of this recipe happened at a small gallery opening where I brought it as a contribution. As people mingled and discussed art on the walls, they kept returning to the grape cluster, and I watched as it became a bridge between strangers—something to comment on, to admire together, to share. By the end of the evening, it was nearly gone, not because it was particularly delicious, but because it had given people permission to reach out, connect, and take something for themselves. That's the real magic of this recipe.
The Art of Arrangement
The secret to making this look effortlessly beautiful is understanding that nature isn't perfectly symmetrical, and neither should your cluster be. Real grape bunches have irregular shapes, with gaps and varying densities—your arrangement should feel alive, not rigid. As you work, rotate the platter and view it from different angles. Step back frequently to see the overall shape emerging. Some of the most stunning presentations I've created had moments where I almost scrapped everything and started over, only to realize that small imperfection was exactly what made it look authentic.
Playing with Color and Contrast
If you have access to three varieties of grapes—green, red, and black—you can create something truly breathtaking by working them in alternating rows or sections. I've also experimented with white grapes for a softer, more ethereal look, and that changed the entire mood of the presentation. Think about the color palette of your table, the lighting of your space, and what story you want the grapes to tell. A sunset-inspired arrangement moving from deep purples to reds to greens creates an entirely different feeling than one that plays with cool and warm tones.
Variations and Personal Touches
Once you master the basic cluster, the variations are endless. I've interspersed small cubes of aged cheese throughout the grapes for a sophisticated charcuterie moment. I've tucked in candied nuts for sweetness and crunch. For gluten-free guests, gluten-free breadsticks work beautifully, or you can skip bread entirely and rely on the salami stem. One unforgettable evening, I added tiny edible flowers—nasturtiums and borage blossoms—tucked between grapes, and guests were genuinely moved by the detail and care.
- Consider the dietary needs of your guests and choose your stem accordingly—bread, salami, or none at all
- Taste a grape or two before committing to your color choice; some varieties are noticeably sweeter or more tart
- If you're making this more than a few hours ahead, keep it in a cool place and add any fresh herb garnish at the last moment
 Pin
Pin This recipe taught me that the most memorable dishes are often the simplest ones—the ones that require nothing but fresh ingredients, a little time, and genuine intention. Every time I make a grape cluster now, I'm reminded that entertaining doesn't require stress or complicated recipes; it requires showing people that you see them and want to create something beautiful for them to share.
Recipe Q&A
- → What grapes work best for this dish?
Use seedless green and red or black grapes to provide color contrast and ease of eating.
- → How do you create the stem portion?
The stem is formed from a rustic baguette, breadsticks, or thin salami sticks arranged to resemble a natural grapevine stalk.
- → Can this be made gluten-free?
Yes, use gluten-free breadsticks or omit bread entirely, opting for salami stems to maintain texture.
- → What garnishes complement the cluster?
Fresh herbs like thyme, rosemary, or grape leaves add aroma and enhance the natural look of the cluster.
- → How should it be served?
Arrange on a large platter or wooden board and serve immediately to keep grapes fresh and appealing as a centerpiece.
- → Are there variations to add texture?
Intersperse small cubes of cheese or nuts among the grapes for added variety and flavor contrast.