 Pin
Pin I'll never forget the Halloween party three years ago when my friend Sarah asked me to bring something festive but easy. Standing in my kitchen at 10 PM the night before, I realized I needed something that would make people smile the moment they saw it. That's when I remembered a skull-shaped dip my grandmother used to make—but I wanted to modernize it with creamy texture and bright vegetables. I spent the next hour creating this Skull & Bones spread, arranging vegetables like I was sculpting art. When I arrived at the party and unveiled it on the buffet table, the kitchen erupted in laughter and everyone gravitated toward it. That's when I knew this wasn't just an appetizer—it was a conversation starter and a memory maker rolled into one.
I'll always remember my seven-year-old nephew's face when he walked into the kitchen and saw the skull staring back at him from the platter. Instead of being scared, he squealed with delight and immediately started naming the vegetables like they were characters in a story. He called the olive eyes 'the watchful sentinels' and the carrot teeth 'the guardian fangs.' From that moment on, every Halloween party I host features this spread, and the kids treat it like an edible art installation they get to devour.
Ingredients
- Cream cheese, softened: This is your sculpting foundation—soft cream cheese spreads like silk and holds its shape beautifully on the platter. Let it sit at room temperature for at least 30 minutes before you start, otherwise you'll fight with it and your skull will look more like a lumpy potato than a friendly skeleton. I learned this the hard way on attempt number one.
- Sour cream: This magical ingredient adds tang and prevents the spread from being overwhelmingly rich, while keeping it spreadable and smooth. It's the secret that makes people ask 'what IS this delicious thing?' instead of just eating it mindlessly.
- Garlic powder: One teaspoon is your flavor anchor—it brings the whole dip to life without overpowering the cream cheese's gentle nature. Avoid fresh garlic here because it can get bitter and watery as it sits.
- Lemon juice: Those few drops brighten everything up, keeping the spread from tasting flat or stale. It's like opening a window in the dip and letting fresh air rush through.
- Salt and pepper: Season to YOUR taste, not mine—you're the artist here. Start with a pinch of each and taste as you go. This is where your dip gets personality.
- Black olives: Halved olives become expressive eyes that seem to follow you around the kitchen. They're the character-building detail that makes this feel like a creation rather than just a platter of vegetables.
- Red bell pepper strips: These form the smile and add sweetness and crunch that contrasts beautifully with the creamy base. They're also visually stunning—that pop of red against the cream cheese is what draws eyes to your platter.
- Cucumber rounds: Think of these as the skull's textured decorative details that frame the face. They add freshness and that satisfying crunch that makes people feel virtuous about eating vegetables.
- Carrot rounds and slices: Orange against cream cheese is a color combination that just works. Use some for teeth (the satisfaction is real) and some for the nose—it's whimsical and delicious.
- Celery sticks or breadsticks for crossbones: These long pieces form the X underneath the skull's jaw. Celery stays crunchier longer and feels more Halloween-y, but breadsticks add carb comfort if your guests prefer that texture. Choose based on your crowd's vibe.
- Fresh parsley or chives: Optional but encouraged—a sprinkle of green on top makes the whole thing look professionally composed, like you spent hours on this instead of 20 minutes.
Tired of Takeout? 🥡
Get 10 meals you can make faster than delivery arrives. Seriously.
One email. No spam. Unsubscribe anytime.
Instructions
- Create your creamy canvas:
- In a medium bowl, combine the softened cream cheese, sour cream, garlic powder, lemon juice, salt, and pepper. Use a spatula or spoon to mix these together with purposeful strokes—you're not making whipped cream, just creating a smooth, spreadable consistency. This should take about 2 minutes of gentle mixing. The texture should feel like thick frosting that holds peaks.
- Shape the skull:
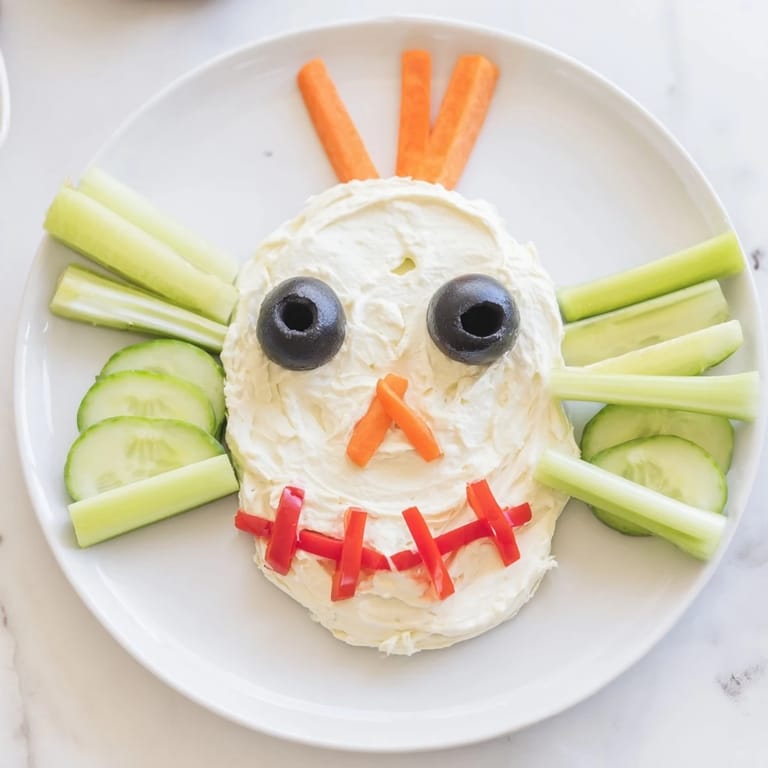
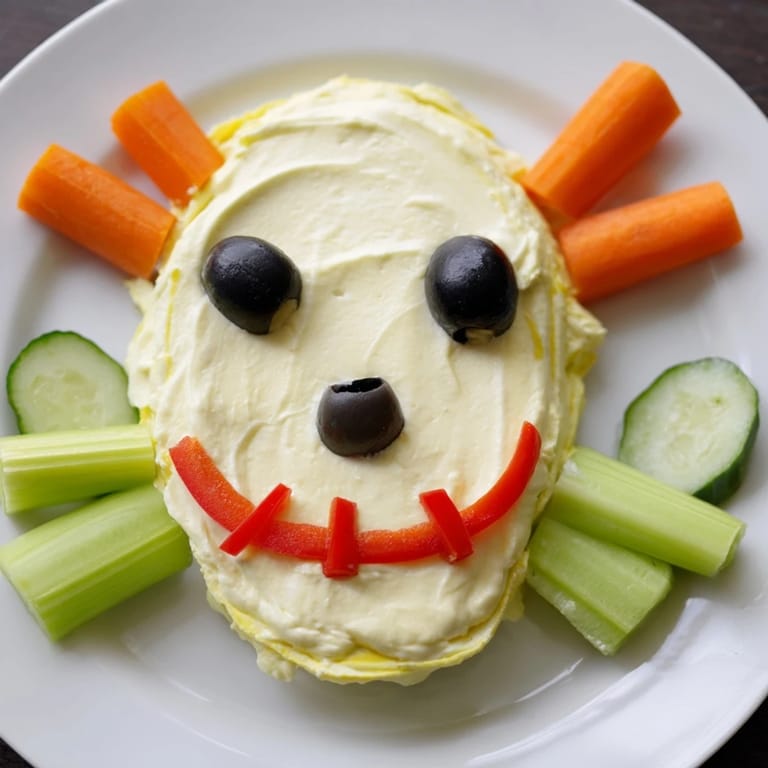
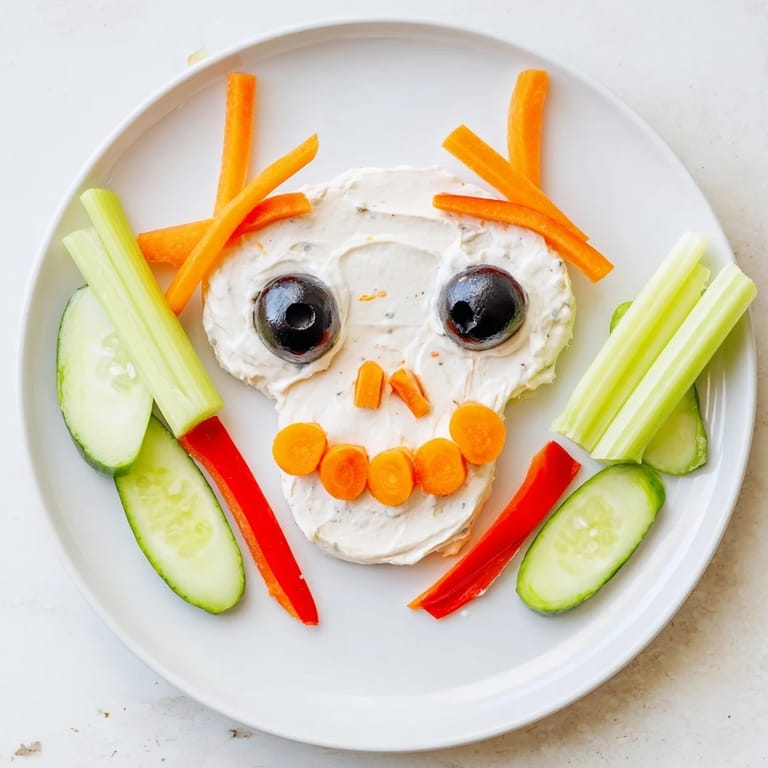
- Pour your cream cheese mixture onto a large serving platter and take a breath—you're about to become a culinary sculptor. Using your spatula, gently shape the mixture into an oval or round skull form, smoothing the surface as you go. Don't stress about perfection; the vegetables will hide any rough spots anyway. Think of it like you're spreading frosting on a cake, but funkier and more forgiving. The skull should be roughly 8 inches long and 6 inches wide.
- Position the crossbones:
- Take your celery sticks or breadsticks and arrange them in an X shape beneath the skull's lower jaw, like you're creating an actual skull and crossbones symbol. This is where the magic happens and your arrangement transforms from 'random dip' to 'Halloween masterpiece.' Make sure they're stable and won't roll around when people start dipping.
- Add the eyes that watch over the party:
- Place your black olive halves where eyes would naturally sit—roughly in the upper third of your skull shape, separated by a couple inches of cream cheese. These olives are surprisingly expressive; they'll give your skull personality and attitude.
- Build the face features:
- Create a nose using a small carrot piece or additional olive slice in the center of the skull. Now for the mouth—this is the fun part. Arrange your red bell pepper strips in a curved smile or grimace (you choose the mood), and place carrot rounds below them to create teeth. Make it friendly or menacing depending on your vibe.
- Complete the decorative details:
- Fill in any remaining cream cheese gaps with cucumber slices, additional carrot rounds, or bell pepper pieces. Think of this like you're completing a mosaic—you're creating texture and visual interest that makes people lean in closer. Each vegetable placement adds color and personality to your creation.
- The final flourish:
- Sprinkle fresh parsley or chopped chives over the top if you're using them. This adds color contrast and makes the whole arrangement look intentional and composed, even if you're still figuring out which way looks least weird.
- Chill and serve:
- Keep your skull covered and refrigerated until 15 minutes before serving. This gives the flavors time to meld and ensures everything stays cool and fresh. Remove it from the fridge just before your guests arrive, arrange crackers or vegetable dippers around the platter, and prepare yourself for the delighted reactions that are definitely coming.
 Pin
Pin Two Halloweens ago, my elderly neighbor Martha came to a party where I served this skull spread. She stood in front of the platter for a long moment, and I thought maybe it was too silly for her. But then she smiled—really smiled—and told me that seeing something whimsical and fun reminded her of making Halloween costumes with her daughter decades ago. She spent the whole evening munching on vegetables and sharing memories with guests, using my silly skull as the conversation centerpiece. That's when I realized this recipe is actually about connection and joy, and the skull is just the beautiful vessel that makes those things possible.
Why This Works as a Party Essential
There's something almost magical about serving food that's visually entertaining. People don't just eat this spread; they experience it. They laugh when they first see it, they take photos, they call other people over to look at it. It becomes an instant focal point on your appetizer spread, and it actually tastes so good that people keep coming back for more even after the novelty wears off. The creamy garlic base combined with fresh vegetables creates a flavor profile that feels sophisticated but never pretentious, which is exactly what you want when you're also serving a skull-shaped dip.
Making It Your Own
The beauty of this recipe is that it's endlessly customizable depending on your ingredients, your crowd, and your creativity. Some people add fresh dill or tarragon to the cream cheese base for herbaceous depth. Others use ranch seasoning packets for a classic crowd-pleaser approach. I've experimented with adding finely chopped sun-dried tomatoes, crispy bacon bits, or even hot sauce for people who like their dips with a kick. The skull shape remains the same, but the flavor story changes based on what you decide to highlight. This is YOUR Halloween appetizer—make it taste like you, not like a recipe website.
Timeline Tips for Stress-Free Hosting
One of my favorite things about this recipe is that it removes stress from your party prep timeline. You can assemble the entire spread up to 4 hours before guests arrive, cover it with plastic wrap, and keep it in the refrigerator without any quality loss. In fact, letting it sit cold for a few hours helps the flavors blend beautifully. This means on party day, you're not frantically assembling things 10 minutes before people arrive—it's already done, looking spectacular, and ready to impress. You can focus on greeting guests, mingling, and actually enjoying your own party instead of sweating in the kitchen. That's the real magic right there.
- Prep all vegetables the night before and store them in airtight containers so you're not chopping day-of
- Mix your cream cheese spread base up to two days ahead and keep it covered in the refrigerator
- Assemble the skull up to 4 hours before guests arrive, then just bring it out and watch the reactions happen
 Pin
Pin Every Halloween when I make this skull spread, I'm reminded that the best entertaining happens when you combine deliciousness with a little bit of playfulness. Serve this with confidence and watch your guests transform from hungry appetizer-grabbers into genuinely happy party people who keep talking about that amazing skull dip you made.
Recipe Q&A
- → What ingredients give the spread its creamy texture?
The creamy texture comes from softened cream cheese combined with sour cream, enhanced by garlic powder and lemon juice for flavor.
- → How are the skull features created using vegetables?
Sliced cucumber forms the skull’s outline, black olive halves become eyes, red bell pepper strips make the mouth, and carrot rounds represent teeth and nose.
- → Can this spread be served gluten-free?
Yes, using celery sticks instead of breadsticks keeps the dish gluten-free, while maintaining the crossbones look.
- → What tools are helpful for assembling the spread?
A mixing bowl, spatula, large serving platter, and a small knife for precise vegetable cutting help make assembly easier and more precise.
- → What garnishes enhance the presentation?
Fresh parsley or chives provide a pop of green and fresh flavor, enhancing the overall visual appeal and taste.
- → Is any cooking required for this dish?
No cooking is necessary; all ingredients are prepared and assembled fresh for a quick and easy appetizer.