Pin
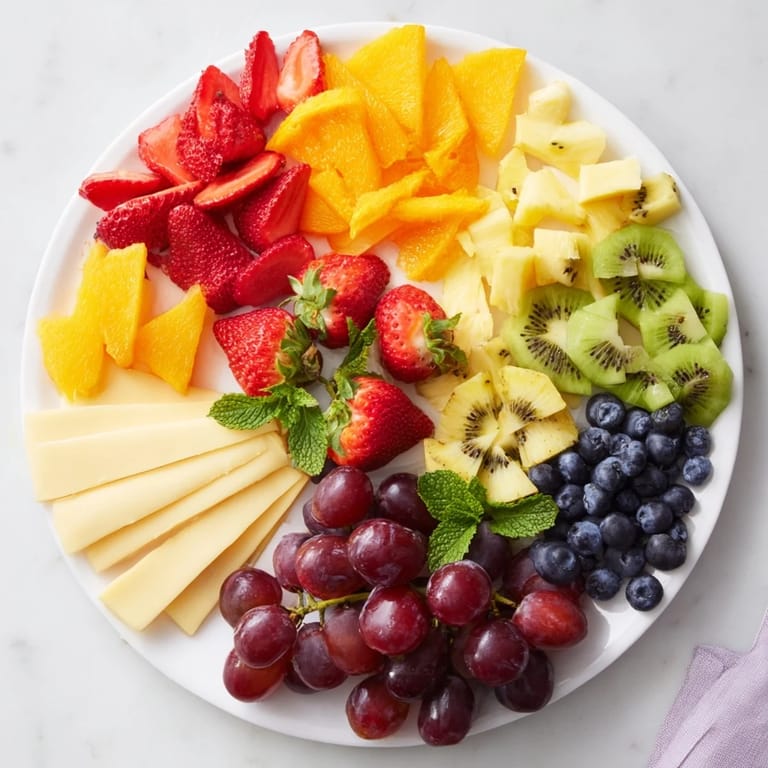
Pin The first time I arranged fruit and cheese in circles, I wasn't thinking about making something beautiful—I was just trying to fit everything on the board without it looking chaotic. But as I kept rotating the pattern, something clicked. The repeating wedges caught the light differently, the colors started to dance together, and what began as a practical solution turned into this mesmerizing kaleidoscope that made my guests actually pause before eating. That's when I realized some of the best-looking platters aren't about perfection—they're about finding the rhythm in simple things.
I made this for a small gathering last spring when a friend mentioned she was tired of standard charcuterie boards. I stayed up thinking about how to make something that felt fresh instead of expected, and the kaleidoscope idea came to me while I was loading the dishwasher—funny how that works. When everyone arrived and saw it, the platter became the conversation before anything else, and that's when I knew I'd stumbled onto something worth repeating.
Ingredients
- Seedless red grapes: They're the easiest fruit to work with because their round shape holds its place on the board, and honestly, they're what keep you snacking while you're arranging everything else.
- Fresh strawberries, hulled and halved: The bright red acts as an anchor color that makes other fruits pop—just halve them cleanly so they sit flat without rolling.
- Kiwi, peeled and sliced into wedges: This is your green moment, and the slight tartness cuts through the sweetness of everything else beautifully.
- Pineapple, cut into small wedges: The yellow-gold color is what actually makes the whole thing feel warm and intentional instead of random.
- Blueberries: These little guys are your secret weapons for filling gaps and creating contrast—they're small enough to tuck anywhere the pattern needs rescuing.
- Small orange, peeled and segmented: The citrus brightness ties the whole palette together and adds complexity that grapes alone can't deliver.
- Aged cheddar, cut into triangular wedges: The sharpness keeps the platter from feeling too sweet, and the golden color mirrors the pineapple in a way that feels intentional.
- Manchego, sliced into thin wedges: Its nutty, buttery flavor surprises people who expect mild cheese, and it holds its shape better than softer options.
- Brie, cut into small wedges: The creaminess and delicate flavor balance the older, bolder cheeses without disappearing into the background.
- Goat cheese, sliced into rounds: The tangy bite and pale color create visual and flavor contrast that makes every bite interesting.
- Fresh mint leaves: A optional garnish that adds aromatic freshness and makes the whole arrangement feel considered, not just assembled.
Tired of Takeout? 🥡
Get 10 meals you can make faster than delivery arrives. Seriously.
One email. No spam. Unsubscribe anytime.
Instructions
- Wash and prepare your fruits:
- Rinse everything, then cut each fruit into uniform wedges or pieces—consistency matters more than perfection because the repeated shapes are what create the visual pattern. This is where your sharp knife earns its place, so take your time and don't rush.
- Slice cheeses into matching shapes:
- Cut wedges and rounds that roughly match the size of your fruit pieces so the pattern feels balanced instead of scattered. The texture variation between soft and firm cheeses is part of what makes this work visually.
- Start at the outer edge:
- Place your platter in front of you and pick one fruit wedge to begin with—I usually start with strawberries because they're unmissable. Lay it at the edge, then alternate with a cheese wedge, creating the first ring of your pattern.
- Build your repeating circles:
- Move inward, switching between fruit and cheese, keeping the same order so the pattern repeats itself as your eye moves toward the center. The symmetry is what makes this feel intentional instead of accidental.
- Fill the gaps strategically:
- Blueberries and grapes become your troubleshooting tools—tuck them into any spaces where the pattern feels broken or color balance feels off. They're small enough to disappear into the design while creating visual rhythm.
- Add mint and rest:
- Scatter fresh mint leaves across the arrangement for color and aroma, then step back and look at it from different angles before serving. The board can sit covered in the fridge for a few hours without losing its impact.
 Pin
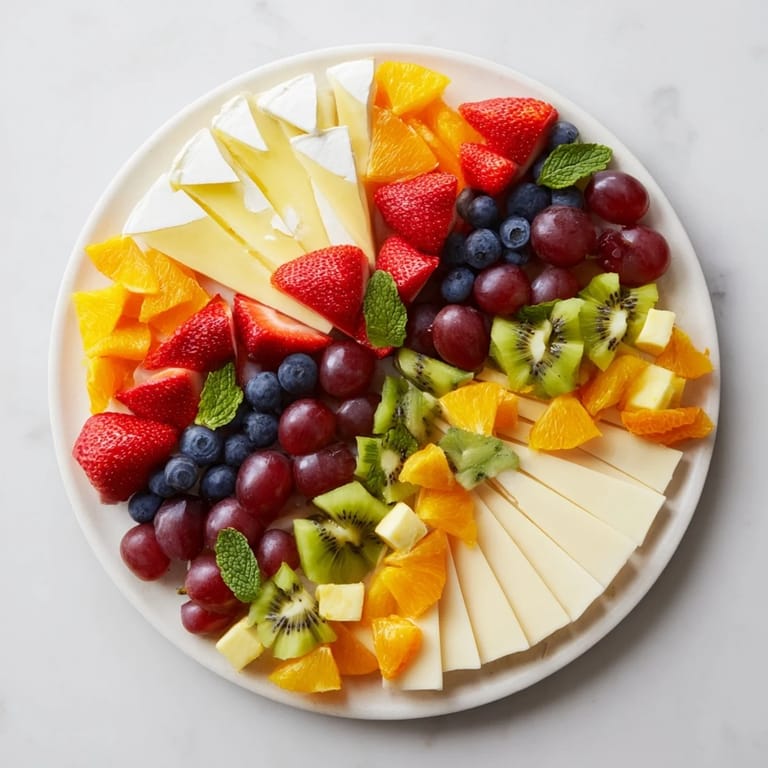
Pin What surprised me most wasn't how pretty it looked—it was that people actually started talking about the arrangement as much as they talked about how good everything tasted together. A sharp cheddar next to a cool strawberry, that creamy brie with a wedge of kiwi—those combinations happened by accident because of the pattern, but they somehow felt intentional. That's when I understood that beautiful food isn't about technique as much as it's about creating moments where people notice what they're eating.
Choosing Your Fruits and Cheeses
The magic here is in the variety, not the specific ingredients. If blueberries aren't in season, blackberries work just as well; if strawberries are expensive, watermelon gives you the same bright red. The cheeses don't have to be exact either—what matters is mixing hard and soft, sharp and mild, pale and golden. I once swapped Manchego for aged gouda and nobody noticed, but they definitely noticed the flavor difference that created. Think of the recipe more as a framework than a shopping list.
Timing and Presentation
This isn't a platter that demands last-minute assembly; that's actually what makes it perfect for entertaining. You can arrange it two or three hours ahead, cover it loosely with plastic wrap, and forget about it until guests arrive. The colors don't fade, the cheese doesn't dry out, and you're free to focus on everything else. The one thing I learned the hard way is that tight plastic wrap can stick to soft cheeses and mute colors, so a loose cover or a cake dome is your friend.
Pairing and Serving Ideas
This board asks for something light—sparkling wine, a crisp white, or rose all work beautifully because they don't compete with the delicate fruit flavors or overwhelm the cheese. I've also paired it with champagne for celebrations and even light beers for more casual moments, and it adapts to whatever vibe you're creating. The board itself becomes the centerpiece, so don't hide it in a corner; let it be the first thing people see when they arrive.
- Serve at room temperature so the cheese flavors shine through fully instead of tasting muted and cold.
- Have small plates and napkins nearby because people eat these with their hands and the juice from fruit will drip.
- If you want to add something savory, candied nuts or marinated olives in the center gaps create depth without breaking the visual pattern.
 Pin
Pin This platter has become my answer to the question of how to feed people something that tastes as good as it looks. It asks for patience and a little planning, but nothing else—no fancy techniques, no risk, just an afternoon of thoughtful arrangement that somehow turns simple ingredients into something memorable.
Recipe Q&A
- → How do I achieve the kaleidoscope effect?
Arrange uniform wedges of colorful fruits and cheeses in alternating symmetrical concentric circles on a large round platter to create the desired visual pattern.
- → Can I substitute any fruits or cheeses?
Yes, swapping in seasonal fruits or preferred cheeses works well. Choose items with contrasting colors and complementary textures for the best effect.
- → How should I prepare the fruits and cheeses?
Wash and peel fruits as needed, then cut into uniform wedges or segments. Slice cheeses into matching wedges or rounds for consistency.
- → What is the best way to serve this platter?
Serve immediately after assembly or cover and refrigerate until ready to serve to maintain freshness and vibrant colors.
- → Are there any suggested garnishes?
Fresh mint leaves add both aroma and a pop of green that complements the colorful arrangement nicely.
- → Can I add savory elements to the platter?
Yes, adding olives or roasted nuts between wedges enhances the texture and adds a savory dimension.