 Pin
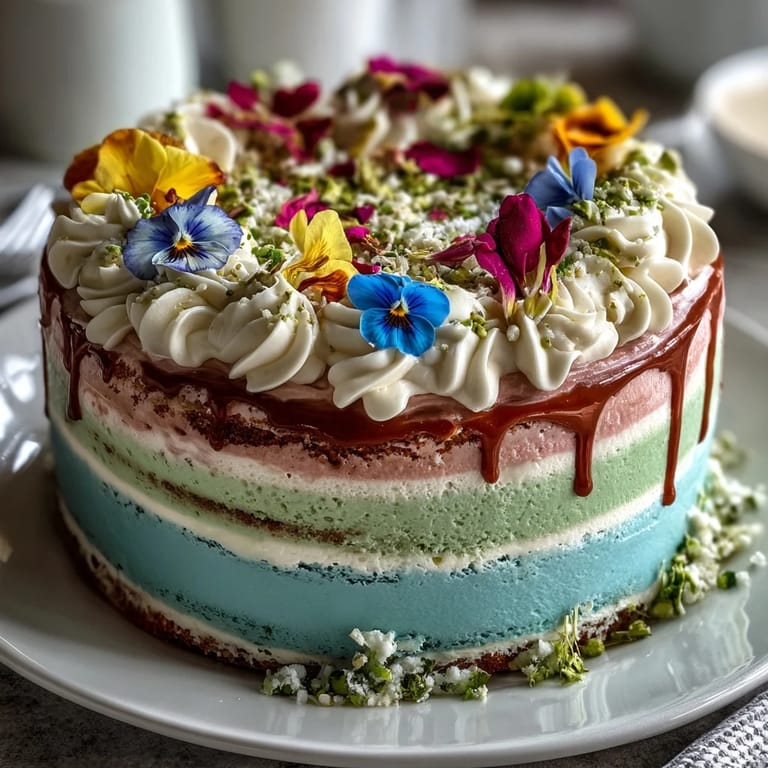
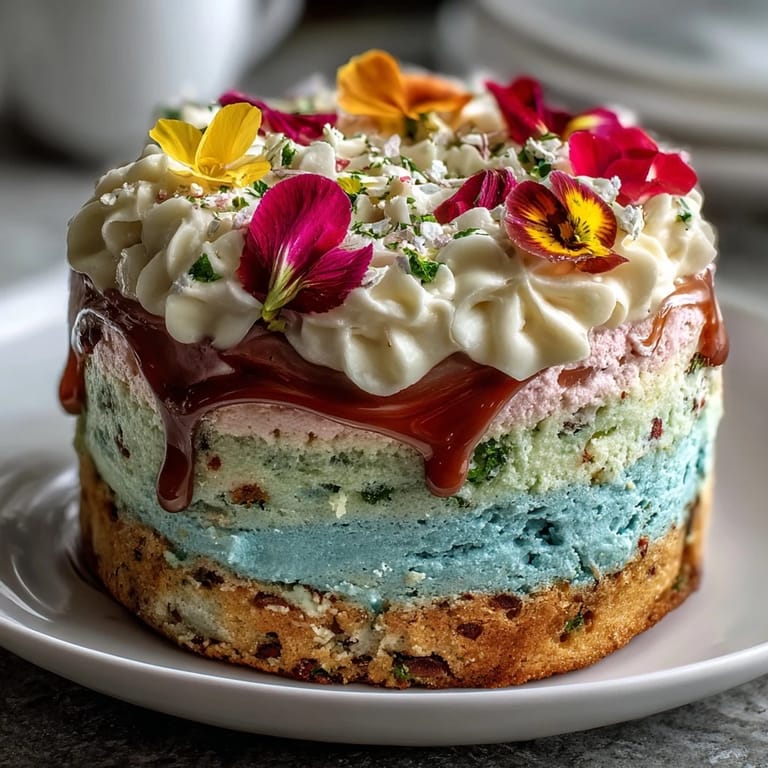
Pin The first time I played with pastel ombre cake layers, the kitchen felt awash with light from the window and colors from the bowls. I remember how the air almost sparkled with anticipation as I mixed gel food coloring into each batch, feeling slightly nervous about achieving that dreamy spring gradient. The scent of butter and vanilla was so comforting that even on a busy day, it made me slow down and focus on each step. There was a moment where a stray flower petal landed on the edge of the counter, and I smiled thinking about how the topper would make the whole cake feel celebratory. This recipe grew from those playful afternoons, turning the idea of a spring cake into something truly beautiful.
One spring, I made this cake for a friend's garden brunch, and assembling it felt almost meditative with everyone pausing to watch the colors come together. It became a little gathering spot on the table, brightening the meal and sparking conversation. My hands smelled faintly of fresh flowers and buttercream by the time we were ready to cut slices, and the excitement was infectious. Someone asked about the edible flowers, wondering if they grew in the yard. It was a reminder that the story behind a cake matters even more than the recipe sometimes.
Ingredients
- All-purpose flour: Sift before measuring for a light crumb and a smooth batter.
- Baking powder & baking soda: Ensures the cake rises with a gentle texture—use fresh for best results.
- Salt: Brings out the subtle flavors in vanilla and butter; don't skip it.
- Unsalted butter: Room temperature makes for easier creaming and a softer cake.
- Granulated sugar: Cream thoroughly with butter to create a fluffy texture.
- Eggs: Let them warm up before mixing to prevent curdling in the batter.
- Pure vanilla extract: Adds warmth and depth—quality makes a noticeable difference.
- Whole milk: Room temperature helps the batter blend smoothly and creates a tender cake.
- Gel food coloring: Use pastel pink, yellow, green or blue—gel colors won't thin the batter.
- Powdered sugar: Sift for a lump-free buttercream that feels luxurious.
- Heavy cream or whole milk: Adjust the frosting consistency as needed, starting with less and adding more if necessary.
- Edible flowers: Choose organic varieties; be sure they're safe to eat and fresh for the prettiest finish.
Tired of Takeout? 🥡
Get 10 meals you can make faster than delivery arrives. Seriously.
One email. No spam. Unsubscribe anytime.
Instructions
- Get Your Pans Ready:
- Grease and line three 8-inch round cake pans with parchment, letting the paper hug the sides—this prevents sticking and keeps layers smooth.
- Mix The Dry Ingredients:
- Whisk together the flour, baking powder, baking soda, and salt until combined and airy; you'll notice the mix feels lighter and more uniform.
- Cream The Butter And Sugar:
- With an electric mixer, beat butter and sugar until the mixture is pale and fluffy—stop to scrape down the sides for even results.
- Add Eggs And Vanilla:
- Crack in the eggs one at a time, listening for the batter to thicken and become glossy, then stir in vanilla extract.
- Alternate Dry and Wet:
- Add flour mixture and milk in turns, beginning and ending with flour; mix just until combined, noticing the silky consistency.
- Tint and Layer:
- Divide the batter into three bowls and gently fold gel food coloring into each for beautiful pastel shades—aim for a gentle ombre gradient.
- Bake The Layers:
- Pour each colored batter into a prepared pan and bake at 350°F until a toothpick comes out clean, with the cake edges gently pulling away—let them cool before stacking.
- Make The Buttercream:
- Beat butter until creamy, gradually adding powdered sugar, vanilla, and a splash of milk or cream; stop when the frosting is billowy and soft.
- Tint The Frosting:
- Divide buttercream and tint each with pastel shades; mix gently to avoid deflating the frosting and to keep colors vibrant.
- Stack and Frost:
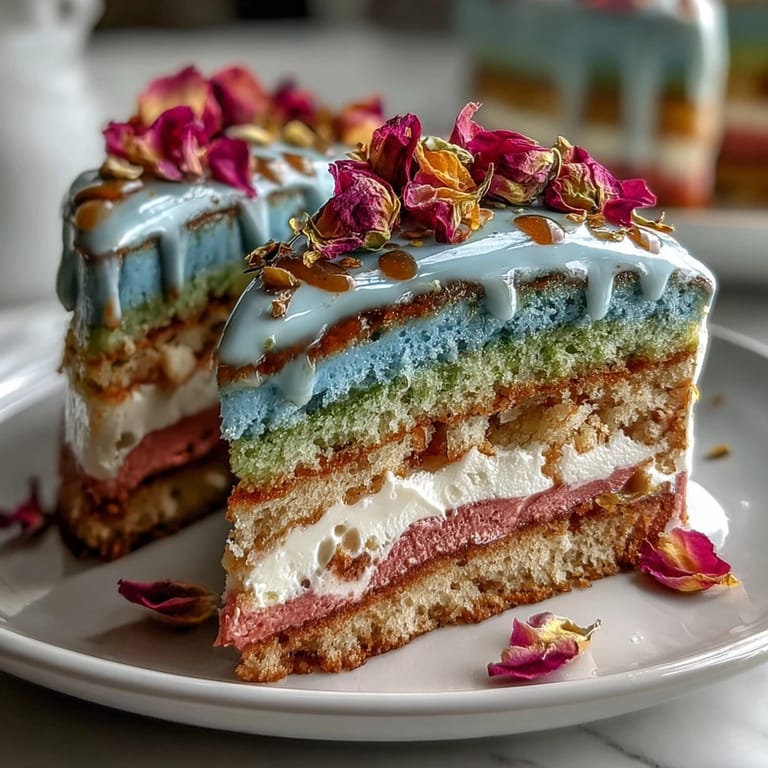
- Level cooled cake layers, spread frosting between them, then apply a crumb coat—chill for a bit before blending the ombre colors across the exterior.
- Finish With Flowers:
- Arrange edible flowers on top just before serving, letting each blossom rest on the buttercream as a final flourish.
 Pin
Pin It surprised me how a simple cake became a centerpiece at my family's spring gathering. The colors drew guests in, but sharing slices and swapping stories transformed the cake into a memory everyone wanted to recreate.
Choosing Your Pastel Palette
Trying out different gel food coloring is half the fun—sometimes the pink fades, or the green turns minty, and each time I discover a new favorite. Mixing a little bit at a time lets you control the shade, so if you want a softer ombre, start with the tiniest dab. The pastel effect depends on gentle stirring and confidence to trust your colors. I learned to keep a damp towel nearby in case of accidental spills. There's no need for perfection—subtle variations make each cake unique.
Perfecting The Buttercream Texture
Beating buttercream until just fluffy, not overwhipped, was a kitchen lesson I learned after a few cracked frostings. The temperature of your butter matters: too cold and the frosting stays stiff, too warm and it turns soupy. Sifting powdered sugar is essential to avoid gritty bits. Sometimes, switching from a mixer to a spatula for the final blend creates that silky finish. If you notice a bubble, just smooth it out gently with your spatula.
Making The Cake Your Own
Personal touches, like extra flowers or a surprise swirl in the buttercream, give this cake its charm and keep people coming back. Changing flavors—lemon zest or almond extract—can make each layer taste different without altering the colors. Decorating together with family or friends turns the baking into a real occasion.
- Try freezing the cake layers for easy stacking.
- Keep edible flowers cold and dry until just before use.
- Don't stress about the ombre—each gradient is a win.
 Pin
Pin This cake has a way of turning a spring day into a celebration—whatever your occasion, it's all about making and sharing beauty. Enjoy the creative process and the compliments that follow.
Recipe Q&A
- → How do I achieve smooth pastel ombre layers?
Use gel food coloring for vivid yet soft colors and mix each batter gently to ensure color consistency in each layer.
- → Can I substitute the edible flowers?
Yes, you may use any organic edible flowers such as pansies, violas, roses, or chamomile, ensuring they're safe for consumption.
- → What tools help create the ombre buttercream effect?
An offset spatula and cake turntable enable easy blending of pastel buttercream shades for a smooth ombre finish.
- → Is this cake suitable for vegetarians?
Yes, all primary ingredients are vegetarian. For a vegan option, substitute dairy and eggs with plant-based alternatives.
- → Can I make this cake in advance?
You can prepare the cake layers and buttercream a day ahead. Add the floral topper just before serving for freshness.
- → How should I store the finished cake?
Store the cake covered in the refrigerator to maintain freshness. Allow to come to room temperature before serving.