 Pin
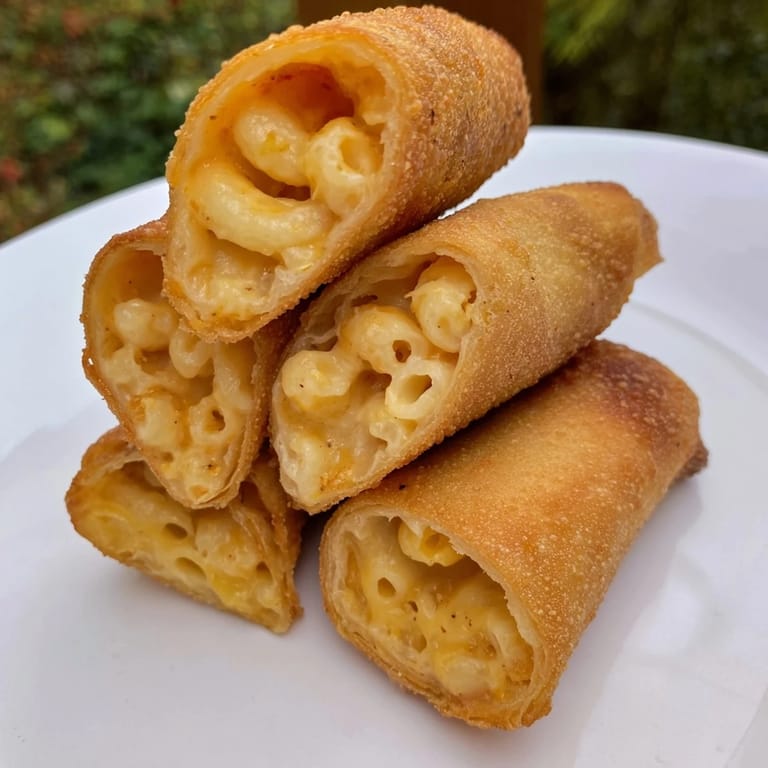
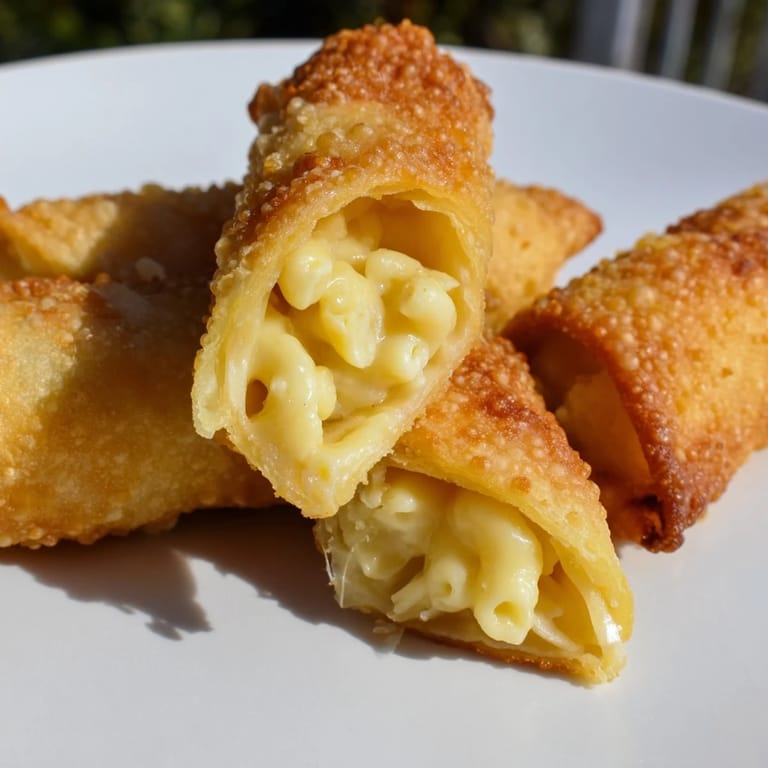
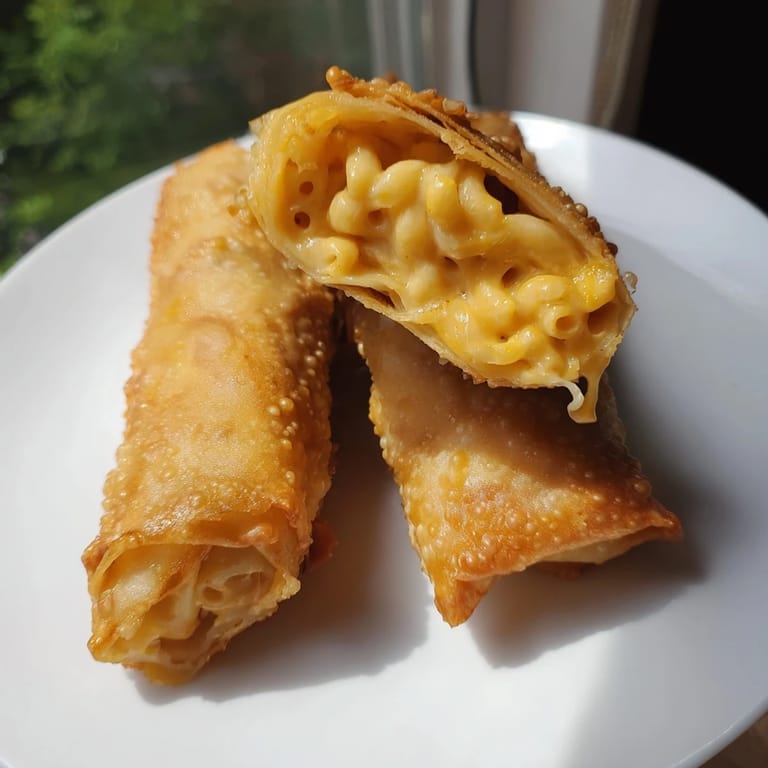
Pin My cousin Tini texted me a photo of lumpia rolls she'd just made, golden and crispy, halved to show the creamy filling inside. But instead of the traditional pork or shrimp, she'd stuffed them with mac and cheese. I laughed at first, then immediately asked for the recipe. When I made them that Sunday afternoon, the smell of crispy wrappers mixing with melted cheddar filled the kitchen, and I realized this wasn't fusion confusion—it was pure genius wrapped in a thin, delicate skin.
I brought a batch to my neighbor's backyard gathering, and within ten minutes the plate was empty. People kept asking what they were, their eyes widening when I told them. An older Filipino woman pulled me aside and said it reminded her of home, but with a twist she'd never thought of. That's when I knew these rolls had crossed into something special—not just snack, but conversation starter.
Ingredients
- Elbow macaroni (200g): Use a good quality pasta that holds its shape and doesn't turn mushy.
- Unsalted butter (1 tbsp): The foundation of your roux; keep it off high heat so it doesn't brown.
- All-purpose flour (1 tbsp): This creates the thickening agent that binds everything together.
- Whole milk (240 ml): Let it reach room temperature before whisking in to avoid lumps.
- Sharp cheddar cheese (120g): Don't skip the sharp—mild cheese gets lost in the wrapper.
- Mozzarella cheese (50g): The mozzarella keeps things creamy and stretchy without overpowering the cheddar.
- Salt, black pepper, smoked paprika: These humble seasonings prevent the filling from tasting flat or one-dimensional.
- Lumpia wrappers (16): Find these in the Asian section or use thin spring roll wrappers if needed.
- Beaten egg (1): This acts as your edible glue, sealing each roll so it doesn't unfurl.
- Cooking spray or neutral oil: Just enough to get that golden crispness in the air fryer.
Tired of Takeout? 🥡
Get 10 meals you can make faster than delivery arrives. Seriously.
One email. No spam. Unsubscribe anytime.
Instructions
- Boil the pasta until it's just shy of fully cooked:
- Cook your macaroni until it still has a tiny bit of firmness in the center. It'll continue cooking slightly inside the roll, so you want to catch it at al dente.
- Make a roux and build your cheese sauce:
- Melt butter on medium heat, add flour, and stir constantly for a minute until it smells slightly toasted. Pour in milk slowly while whisking to keep lumps from forming.
- Add both cheeses and season thoughtfully:
- Keep the heat gentle as you stir in cheddar and mozzarella until they disappear into the sauce. A pinch of smoked paprika adds a whisper of depth without announcing itself.
- Fold the cooled pasta into the cheese sauce:
- Let the sauce cool completely so it sets enough to hold its shape when rolled. This is the moment where everything that felt separate becomes one cohesive filling.
- Assemble each roll with patience and care:
- Lay a wrapper corner-down on your surface, spoon filling near the bottom, fold sides in tightly, then roll toward the top corner. Seal with a brush of egg wash as if you're protecting a secret.
- Air-fry until the wrappers turn golden and crispy:
- A light spray of oil and eight to ten minutes at 400°F will give you that contrast between crunch and creamy center. Halfway through, give them a gentle turn for even browning.
 Pin
Pin The moment I bit into one still warm from the air fryer, the wrapper crackled between my teeth and then gave way to that creamy, cheesy center. It was the comfort of childhood mac and cheese wrapped in the crispy anticipation of biting into a spring roll. Suddenly, the dish wasn't about fusion at all—it was about joy finding a new shape.
Why the Air Fryer Works Here
I considered deep-frying these at first, but the air fryer creates something cleaner and less intimidating. It circulates hot air around each roll evenly, crisping the wrapper without needing to monitor oil temperature or worry about them floating unevenly. The rolls brown beautifully in under ten minutes, and you can watch them through the basket without opening and releasing heat.
Customizing the Filling
While the classic version is perfect on its own, the filling is forgiving enough to welcome additions. Crispy bacon bits add a smoky crunch, fresh scallions bring a bright note that cuts through the richness, and a spoonful of hot sauce mixed into the cheese sauce creates a gentle warmth that builds with each bite. Even a little garlic powder or a shake of cayenne can shift the entire personality of the roll without complicating the process.
Serving and Storing Your Rolls
Serve them warm straight from the air fryer for maximum textural contrast, though they'll stay crispy for a couple of hours at room temperature in a loosely covered container. Leftover rolls can be reheated in the air fryer at 350°F for three to four minutes to restore their crispness. For dipping, ketchup feels natural and nostalgic, sriracha adds a spicy edge, or a simple cheese sauce (thin, dippable version of what's inside) completes the circle.
- Make these rolls a few hours ahead and store them in the fridge until you're ready to air-fry; they'll cook a minute or two longer but stay just as crispy.
- If you're feeding a crowd, you can prep all sixteen rolls at once and keep them on a sheet in the fridge, then cook in batches.
- These freeze beautifully raw, so roll several batches and store them in a freezer bag for whenever you need an easy crowd-pleaser.
 Pin
Pin These rolls are the kind of dish that reminds you cooking doesn't have to choose between tradition and playfulness. They're proof that the best meals happen when you let yourself break the rules and trust your instincts.